There are a couple of hints about how to install anodes on a boat. We will discuss all of them in this article.
Let’s start with the basics:
- The first and the main is that the anodes must contact the protected structure.
- Secondly, sacrificial anodes must be of the proper material for the water and in alignment with the material of the protected structure.
Sacrificial anodes are required where metal parts have potential direct contact with water. Therefore, anodes should be installed on the shaft, and metal underwater parts. That includes a keel, a rudder, a swimming platform, a wake-blade, etc.
On big ships, they typically install anodes on the hull in rows, such coverage may serve somewhat a decade or two, but “over-zincking” is another potential trouble you keep in mind.
They also should not decay faster than you change them, which rarely happens (but happens).
It’s the basics, but there’s more. Let’s see…
TIP Be sure to check this post to find out how do sacrificial anodes work at all!

How to Install Anodes On a Boat – Practical Things to Know
Let’s talk about things to know, answers to some common questions and practical tips that make the process as straightforward as possible.
Replace Anodes Annually or Bi-Annually
Theoretically, you need to count a sophisticated math formula for how much of anode you are to place around your boat. Or call a professional to perform all proper measurements of the currents and anodic indexes.
However, If you own a huge cargo ship, you’d better do so, but for pleasure boats, we do not usually devote that much attention to the “problem”.
Practically speaking, we do not go that far, but we just place the sacrificial anodes the same way anyone else does.
Most boaters replace anodes annually as they haul out the boat or bi-annually because anodes are usually in excellent shape after a year spent in water.
You should not replace anodes if they look fresh enough: the system works; enjoy it working, and let them decay until they reach the condition they are supposed to decay to.
There is nothing wrong with putting fresh ones, though.
Replace Anodes Once They Become Twice Smaller in Size
The general rule says the point of the catastrophe is when sacrificial anodes become twice smaller in their size, yet some anode manufacturers allow 2/3 of mass being lost.
In reality, such may take two to four years, but if you replace anodes annually or bi-annually, you shall enjoy a less scary image of your underwater part.
Do Not Paint Anodes
Yet another important message – do not paint anodes. They should be in contact with the metal that they protect.
Sacrificial anodes should also be in contact with water for the whole system to work. Do not coat nor paint sacrificial anodes.
Where Do Anodes Go On a Boat?
Sacrificial anodes protect metal parts of the boat, which are exposed, or potentially exposed, being coated now when you only decide about sacrificial anode topology.
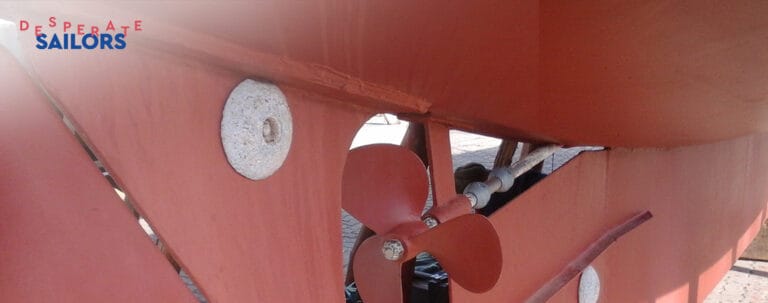
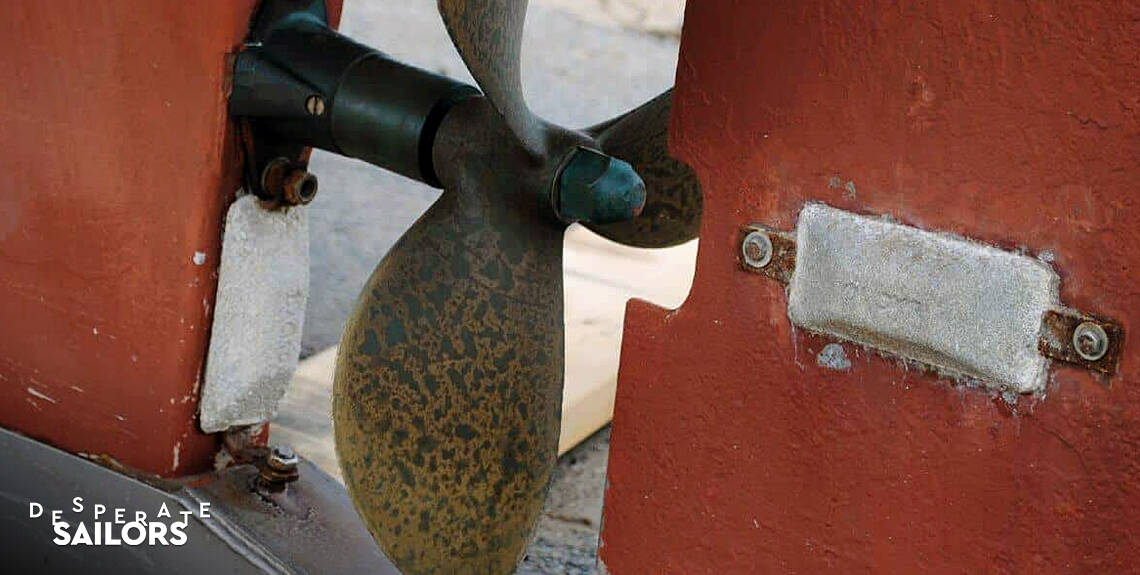
- The shaft is usually a must-be-protected metal piece of a boat. We usually place two small spherical anodes along the open part of the shaft, but it also depends on how much of the shaft you have exposed.
- Hull, if metal or significant metal parts require protection.
- Keel, if metal or metal parts.
- Swimming platform mechanisms, if any.
- Rudder, if metal.
- Wind-wane, if you wish.

How to Install Anode on an Aluminum Boat
An aluminum boat is already aluminum and can serve as an anode herself.
We need magnesium anodes to protect an aluminum hull or parts of the boat. While zinc may work great in salt water, magnesium is more expensive and loses mass too fast in salt water.
Things to keep in mind:
- Anodes should be in direct contact with the metal they protect. Often a bolt plays a role as a connector, so do not paint holes where bolts sit as they contact anodes by penetrating through the structure that is to be protected.
- If the metal is inaccessible to the anode for some reason, then use a wire.
- The basic rule is that we place anodes along the length, so their amount is dependent on the size and length of the structure supposed to be protected.
- If a whole boat is a structure we protect, then the number of anodes for the boat depends on the length of the boat.
- Overprotect can happen when too much magnesium creates too much current, especially in salt water and polluted fresh water. We call it “over-zincking,” but it means an excess amount of anode made of any alloy.
- Magnesium is the most expensive type of anode, rather than zinc or aluminum.
- Zinc anodes may work well for aluminum boats in saltwater.
PRO TIP Anodes influence the area of about six-ten feet (two-three meters) around them.
Two more things:
- Along the hull, if there are any, anodes are usually placed (if placed) at three-seven feet intervals (one-two meters), also depending on the size of the anodes.
- Hull anodes are often welded directly to the hull and rarely bolted.
How Often Should a Sacrificial Anode be Replaced on a Boat?
Anodes last long, at least two years, and longer, once they sit properly, and they are not magnesium in saltwater for an aluminum boat – those destroy themselves faster.
You can see how anodes perform by how they decay. Anodes should not stay fresh whatsoever.
Nothing is wrong with replacing anodes with fresh ones, however.
Usually, you replace them annually or bi-annually, provided that the haul out of the boat happens somewhat like this schedule too.
Size of Sacrificial Anodes for Boats
There is a complicated calculation of how many and what size of sacrificial anodes for boats should be placed. However, most people I know play it by ear.
We always see anodes, we can compare, then watch how anodes are worn out as soon as they do the job, then you adjust if you want bigger ones or of another material – empirical method.
Overdose of anodes may happen, also called “over-zinc”, less stress for fiberglass boats, but for wooden boats, severe over-zincking may lead to rot, and for metal boats, coat and paint may lose color, then flake away.
PRO TIP Roughly considered, 1% of the protected surface should be anodes.

How to Install Anodes on a Boat – Directions
Basically, you do not need to weld anodes to the hull every time. The hull anodes last longer once you understand the full idea of how to install anodes on a boat, at least the rudder and the shaft.
Measure the diameter of the shaft, which you’ll address to a chandler’s shop to pick a proper inner diameter of anodes (those going to the shaft). The outer diameter should already be of a size adequate to the inner diameter.
Sacrificial anodes that wrap the shaft are usually measured by the inner diameter, equal to the diameter of the shaft.
Do not care about their outer size as soon as it fits because the shaft diameter fits. One anode every ~1.5 feet along the shaft’s length, or at least one if it is a short shaft.
Few Extra Things
- Round anodes are measured in inches as everything of a round shape is usually measured.
- All you need is to detect visually the type of anodes already installed on a boat and just buy the same.
- Buying a little bit bigger or a little bit smaller size is not the end of the world. Chandler shops often lack the exact type.
- If you keep used anodes for some reason, remove and sand them (if they are bolted, not welded).
- It is hard to achieve, but just in case we mention again, do not over-zinc your boat.
Bottom Line
Let’s wrap up our thoughts on how to install anodes on a boat.
Remember, the main principle of installing anodes on a boat is that the anode should contact (short-circuit) the metal structure it protects.
Paint neither the anode nor where the bolts sit, if the latter is for making the short-circuit, and there are no extra wires for that.
You can seal to prevent further water penetration underneath anodes, but you must establish good contact between metals.
Consider adding a piece of wire to make the connection even more reliable if you want to.
Hope this helps! Any more tips? Drop us a comment below.